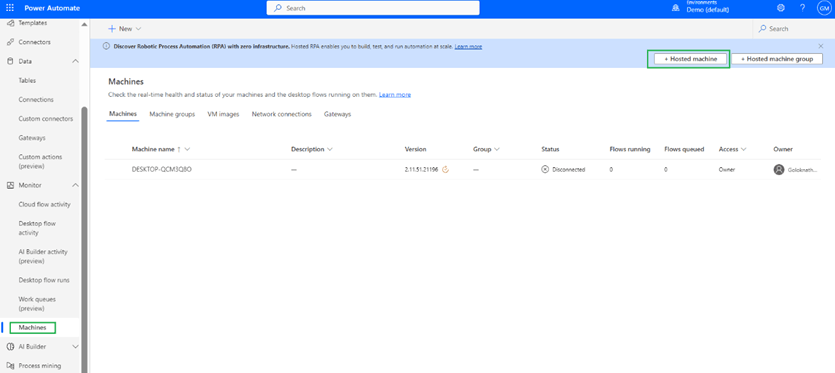
Hosted machines allow you to build, test and run attended and unattended desktop flows without providing or setting up any physical machines.
To create and use hosted machines you should have –
A valid and working Intune and Azure Active Directory tenant.
Intune device type enrolment restrictions are set to Allow Windows (MDM) platform for corporate enrolment.
Steps to create new hosted machine – Navigate to Monitor à Machine à Hosted machine as highlighted
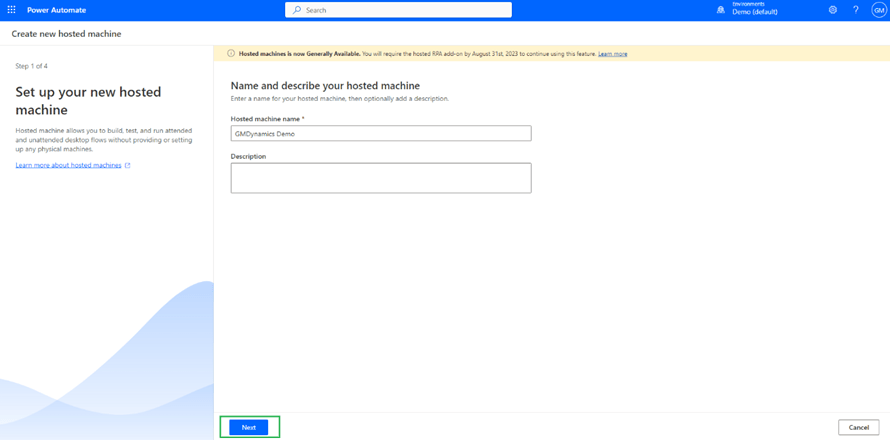
A page will display to create a new hosted machine as shown. select a name of Hosted machine and description and click next
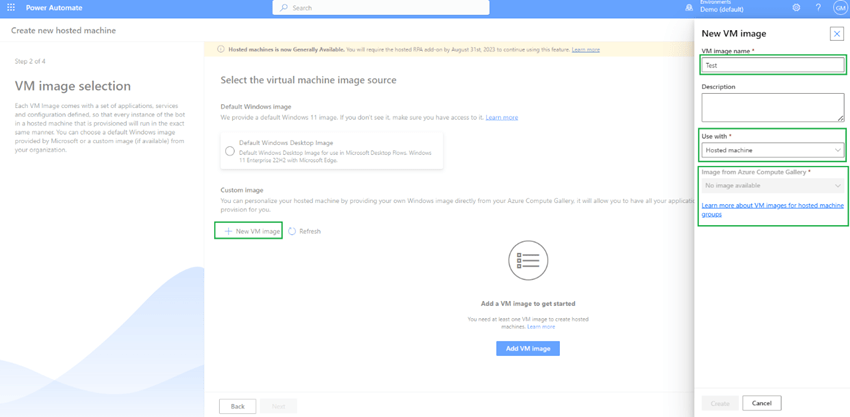
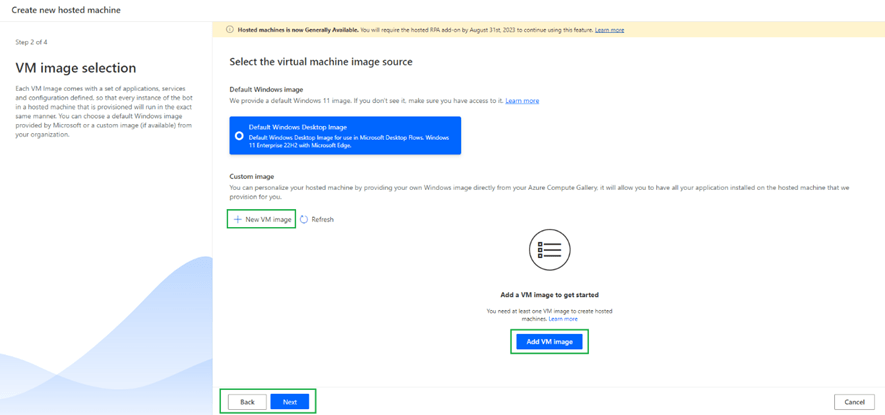
If you have any VM image available you can use or else can use default
When you click on + New VM Image you will see an option to select name along with options to use with – 1. Hosted Machine 2. Hosted Machine Group 3. Both
I have selected hosted machine but I don’t have any image available.
So, I have selected default windows 11 enterprise VM and then click next
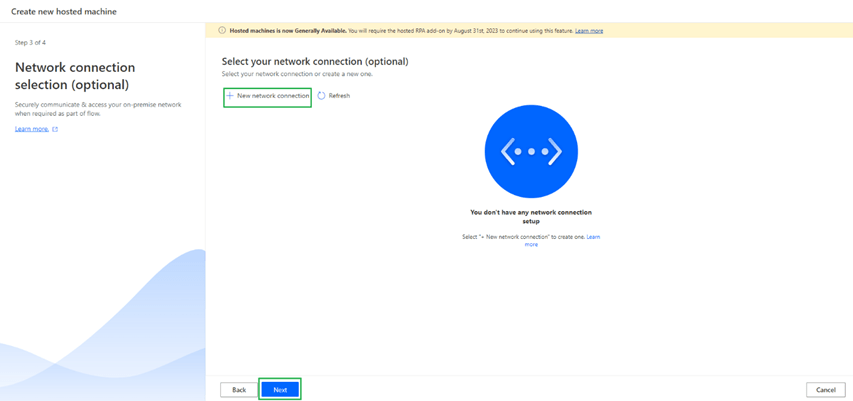
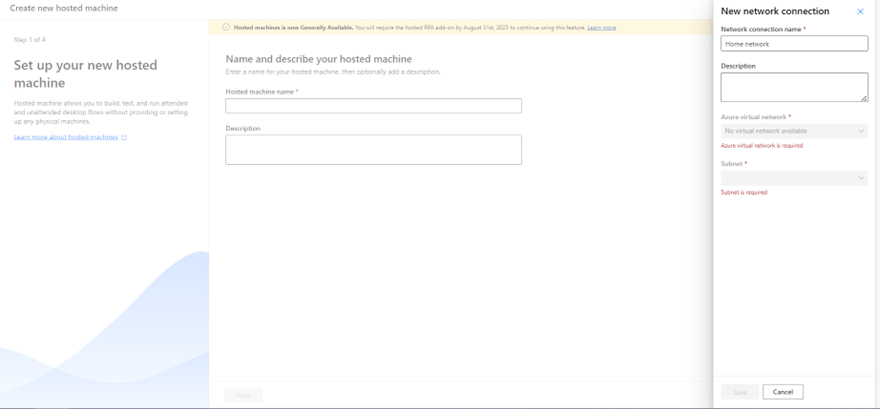
If you want to add any custom network setup you can do by clicking + New network connection as shown
When I try to add a new network for me, I don’t have any azure virtual network as shown
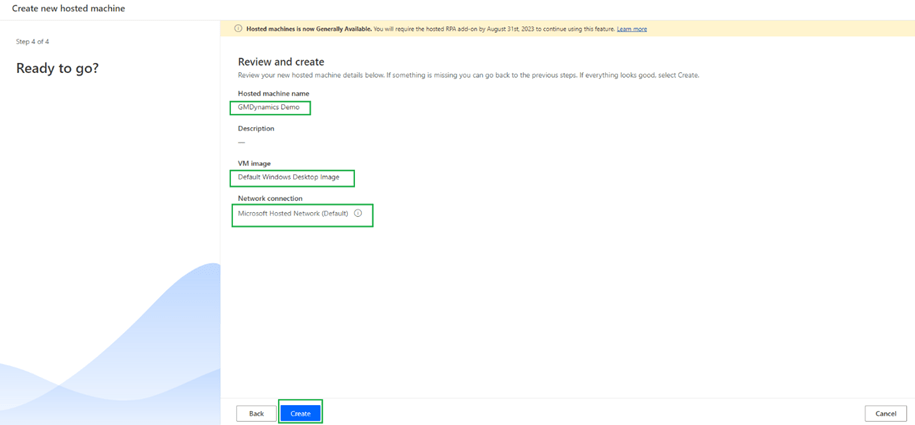
So, I have not selected any network and clicked next. If you notice default network and VM Image is selected as shown
Then you will see below during provisioning of VM as shown
Once it’s provisioned you can see the machine as below
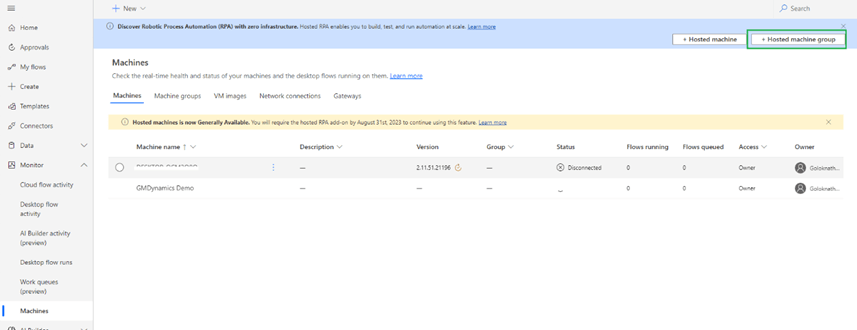
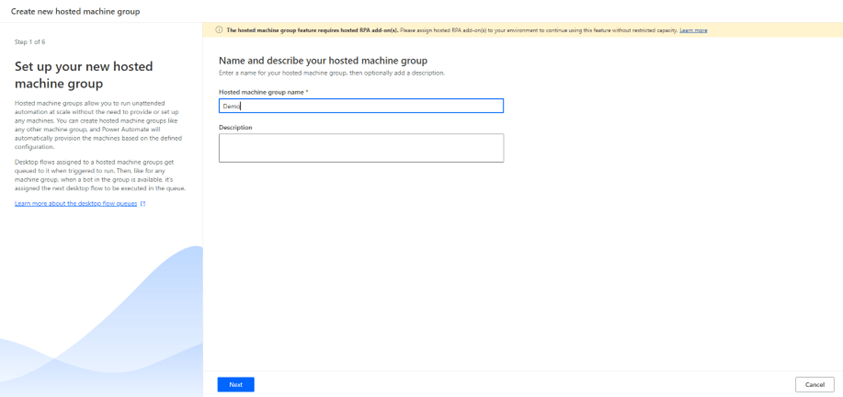
Hosted Machine groups can be created clicking on Hosted machine group as highlighted below
On click of Next you can see below in which you can select the feature to Re-use session.
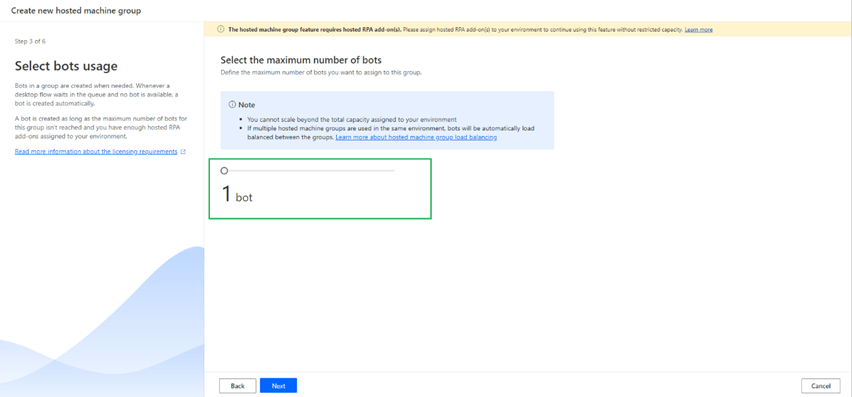
On click of next you can assign maximum number of bots you want to run on this machine group
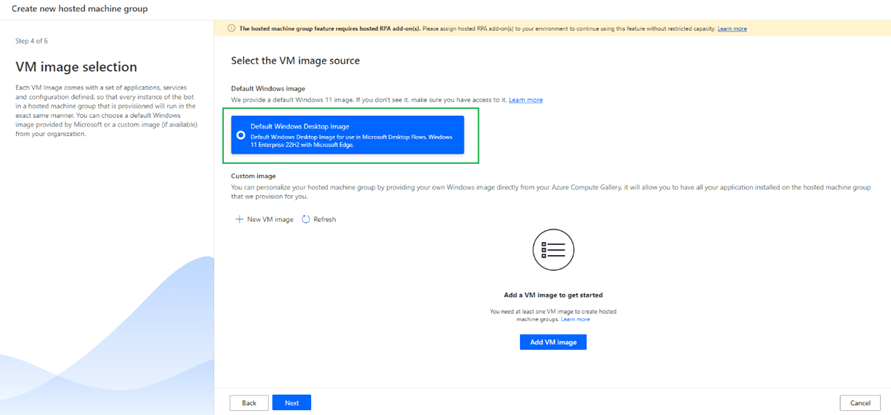
Select the VM image, I have selected default VM Image as shown
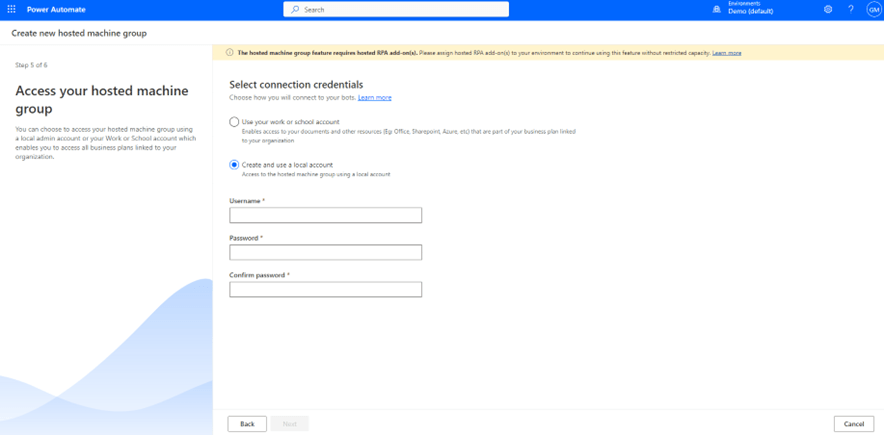
Choose how you want to connect to your bots next as shown below either you can
use work or school account.
Create and use local account
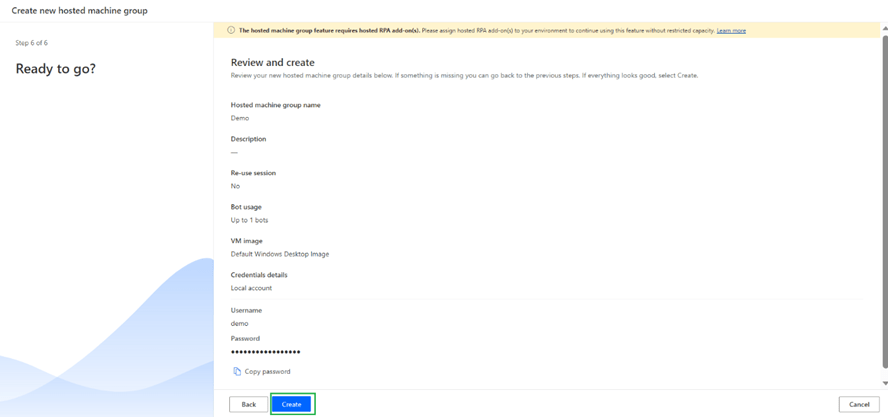
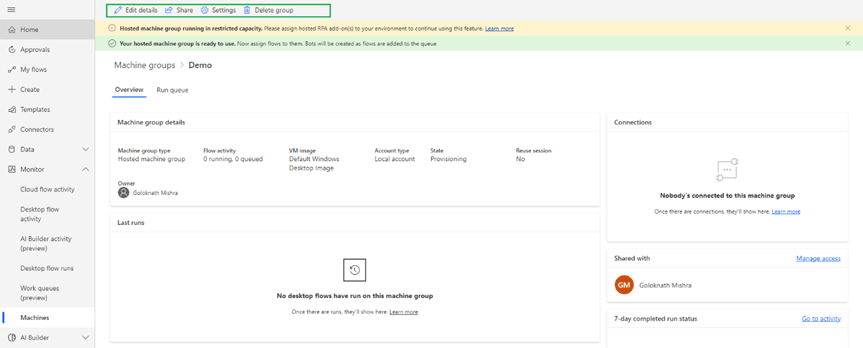
Once hosted machine groups are created you can see the status as below
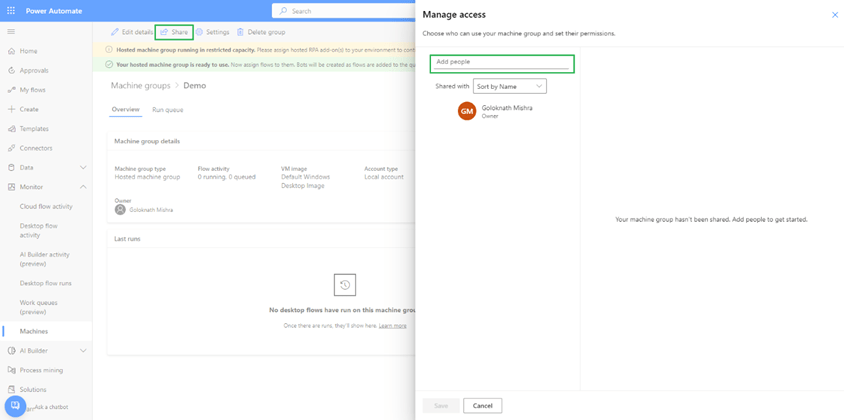
On click of share you can share hosted machine group as highlighted
On click of settings you can select max number of bots, reuse sessions and enable maintenance mode.
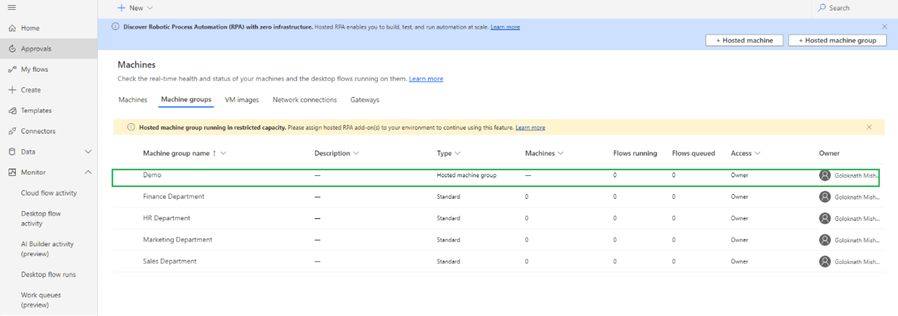
You can see hosted machine group listed under machine groups as shown below
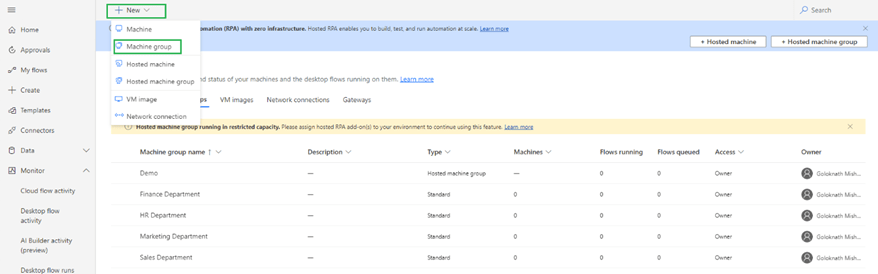
You can create new machine groups by clicking +New within machine group as highlighted below
As per the research from McKinsey & Company, there is an opportunity for cybersecurity technology and service providers of $2 trillion due to the increase in digital crime because of the increase in online and mobile interactions. Please refer below report –
Here we will discuss FIDO2 Protocol. FIDO is a standard that uses the Web Authentication API and Client to Authenticator Protocol to authenticate users via public key cryptography from a local device, such as a token or smartphone. The latest version is FIDO2.
FIDO Protocol is a product of FIDO Alliance (https://fidoalliance.org/) an open industry association that is focused on authentication standards by removing dependency on passwords.
Today we will see how we can secure our accounts by using the FIDO2 security key. Thanks to FEITIAN for shipping me ePass FIDO – NFCK9.
It’s FIDO U2F & FIDO2 Certified Security Key. A single ePass FIDO – NFCcan protect unlimited accounts across multiple websites. It supports both USB and NFC interfaces. For more information please visit – https://www.ftsafe.com/Products/FIDO/NFC
Let’s start our DIY –
Beauty of Office365 which natively support for additional authentication only need to perform certain steps.
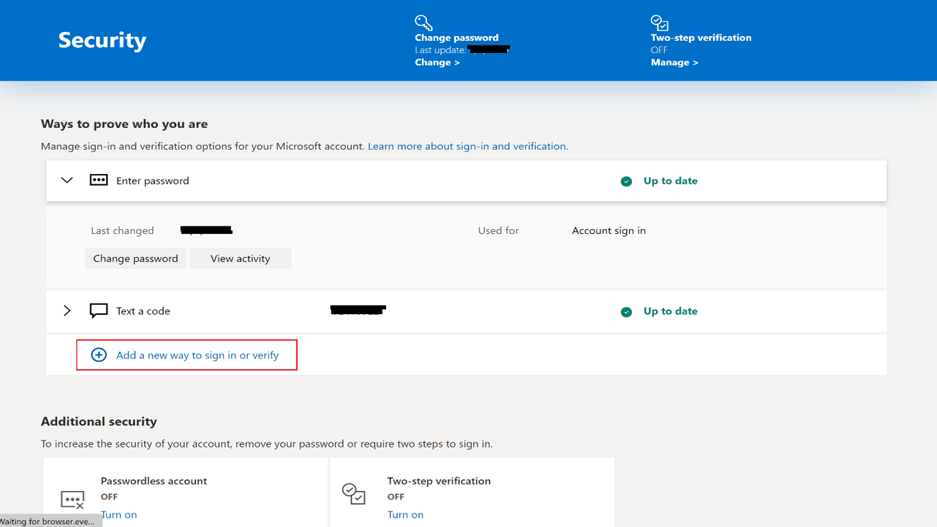
Let’s do it.. Log in to your Microsoft Office365 account and click on Security as shown in the below snapshot
Click on Advanced Security Option -> Get started
Click on Add a new way to sign in or verify as shown in the below snapshot
Then you can see options to select the way of authentication.
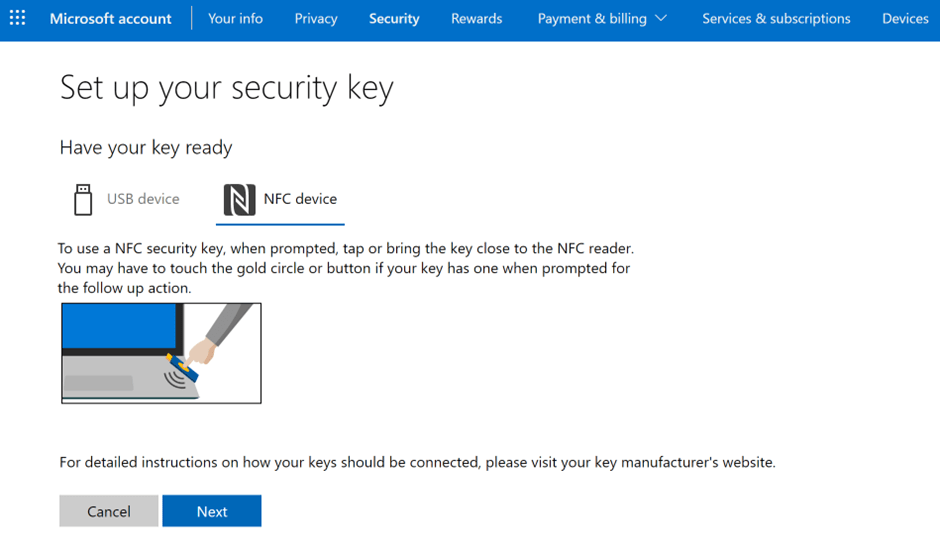
When you select Use a security Key below options will display as shown in snapshots.
Using USB Device-
Using NFC Device-
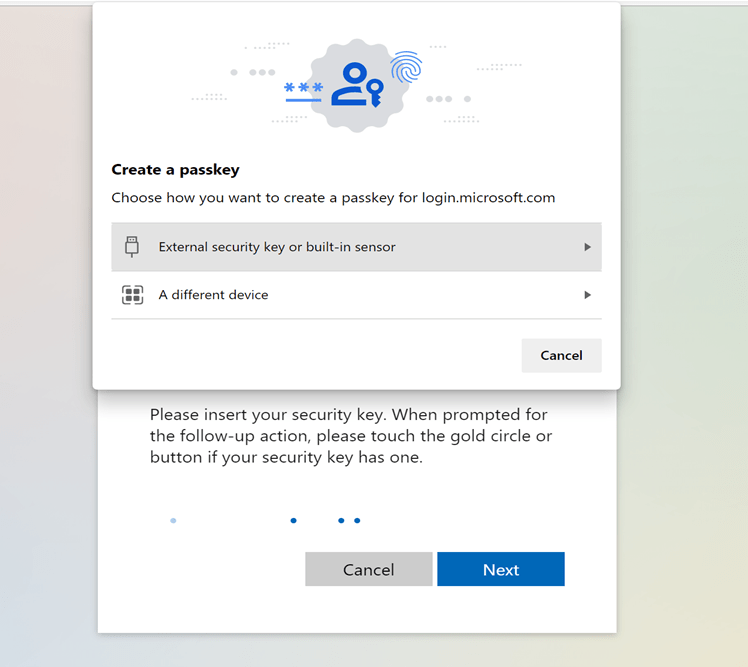
Select the option as per the device configuration and click Next. You will get a prompt to create a passkey selecting External Security Key or built in sensor as shown.
Once you entered passkey system will prompt to insert the security key into the USB port and then touch on the sensor on the device.
Once setup is done please name it and click Next
Then you are all set for the FIDO key authentication as shown in below snapshot.
Now if you navigate to security you can see additional authentication.
Now you can login using Sign in with Windows Hello or a security Key .
N.B – You can try this for 2 factor authentication also to add additional layer of protection. Happy Learning!
Integer: It accepts whole number numeric values e.g., 1,2,3,4 etc.
Float: It accepts decimal numeric values e.g., 1.2, 2.4, 3.45 etc.
String: It accepts text input e.g., Hello, World, Power, Automate etc.
Object: It contains key value pair properties which is in JSON format.
Array: It is list of objects which can be either number or string that have same data type
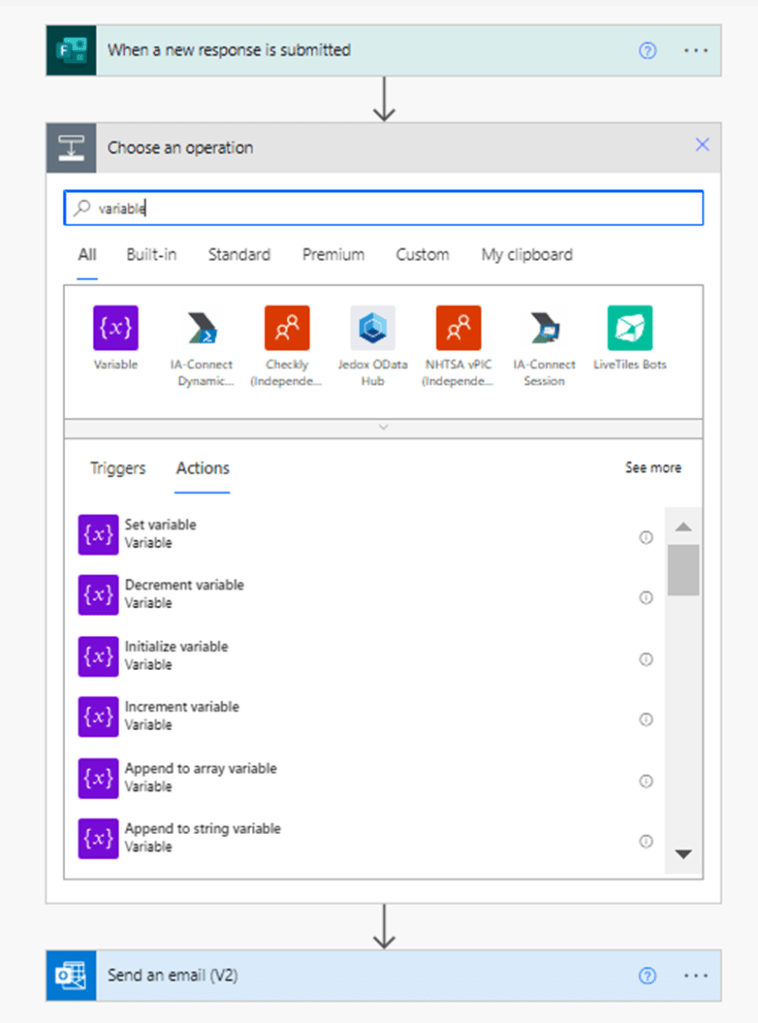
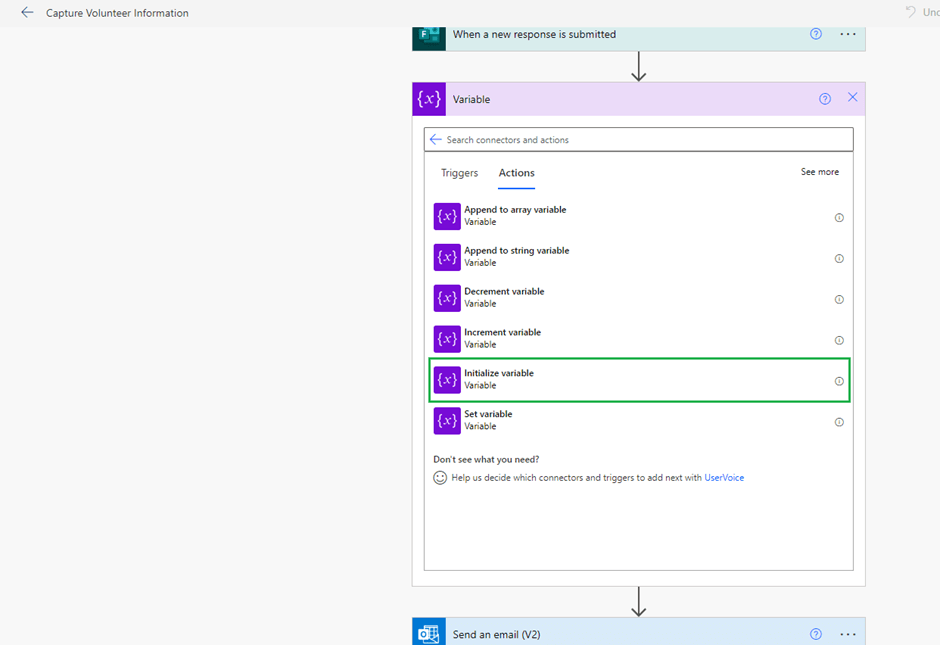
Type variable to see the operations on variable as below
Then select initialize variable as below –
Once Initialize variable selected, you need to fill mandatory parameters Name of Variable and Type as shown
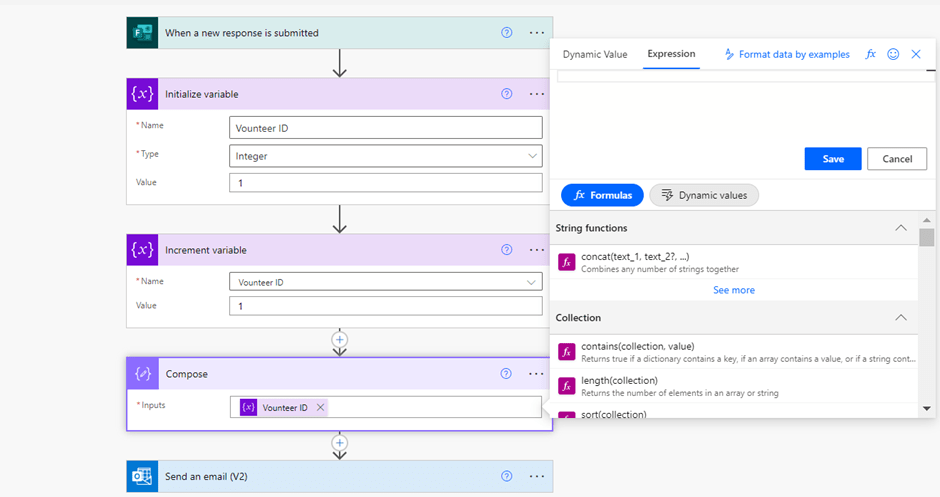
To use format data by example for expressions here is the below step
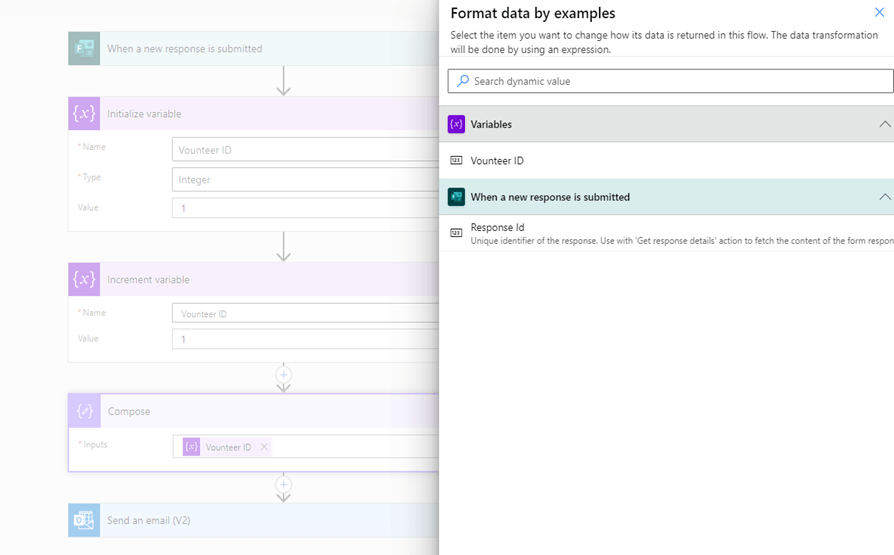
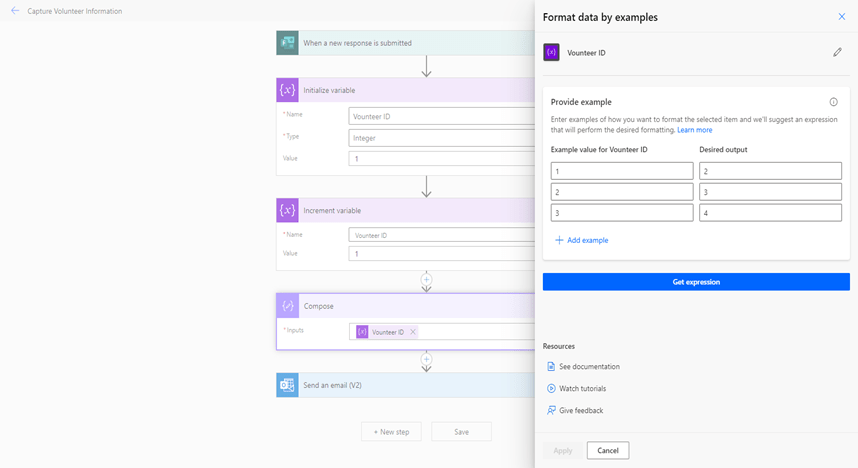
on click of format data by examples below screen will display
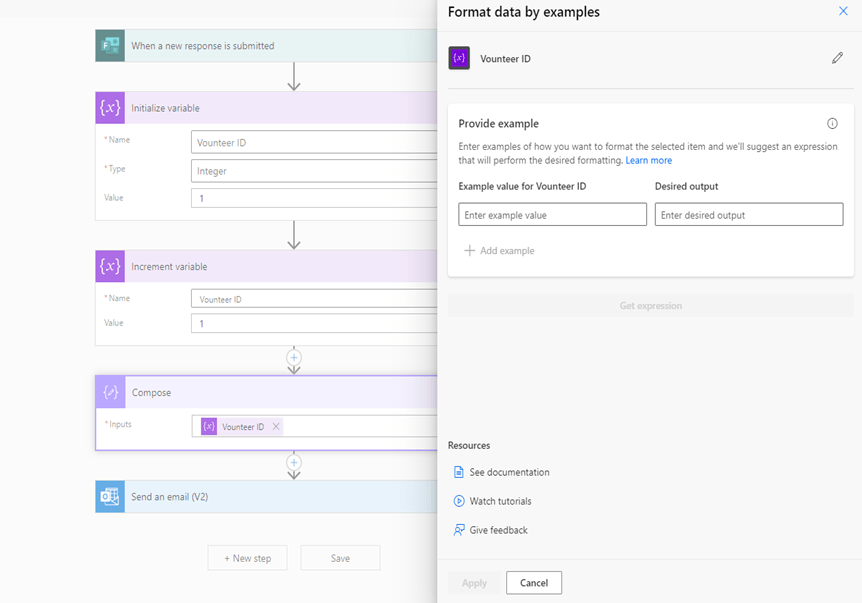
Let’s say I want to know the expression to auto increment variable Volunteer ID here is the step – Select Volunteer ID and it will display screen as below
Provide examples of input and desired output
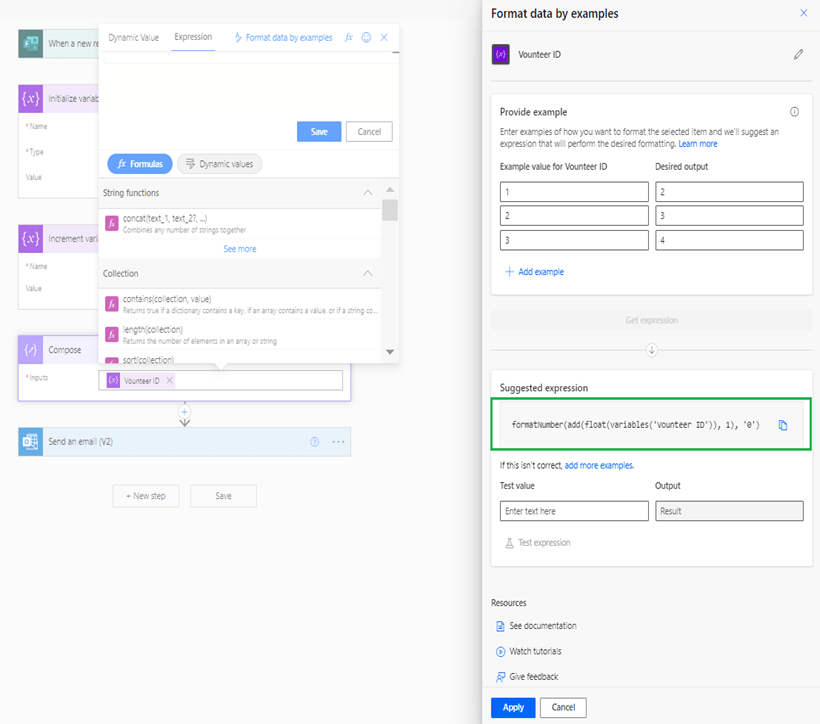
Then click on Get Expression it will display a suggested expression as highlighted below
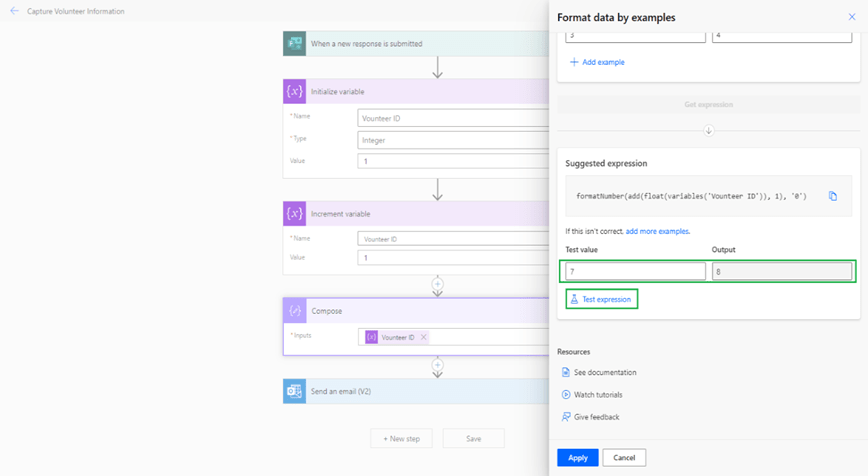
If you want to test the expression, then enter the input under Test Value and click on Test Expression as shown below. Then click on Apply to use the expression.
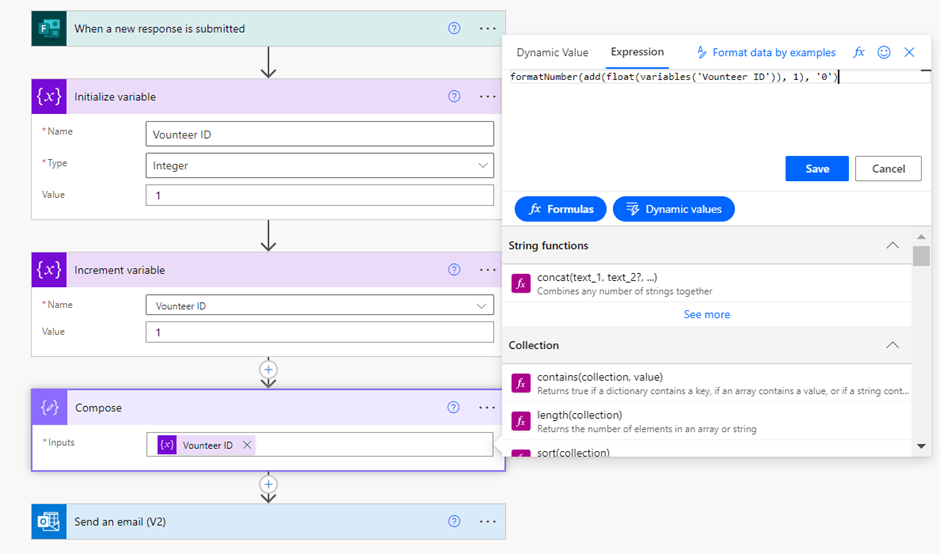
Then it will add the expression under expression field.
If you knows the functions then directly you can add below expression
Then click on save to add the expression to the compose.