Microsoft Dynamics 365, Power Platform enthusiast having around 15 years of experience with complete SDLC. Along with that active Community Lead, MCT and Speaker.
Multi-Model Choice: xAI Grok 4.1 Fast in Microsoft Copilot Studio
This announcement highlights the expansion of the Copilot Studio model library to include xAI’s Grok 4.1 Fast, offering makers more flexibility and speed for reasoning and text-based agentic workflows.
Real-time User Journey
The user journey focuses on high-speed reasoning and deep tool integration:
Selection: A maker building an agent in Copilot Studio identifies a need for high-speed text processing or large-context reasoning.
Configuration: The maker switches the agent’s “brain” to Grok 4.1 Fast within the model selection settings.
Prompting: The user interacts with the agent. Grok 4.1 Fast processes complex natural language instructions and handles deep tool use (e.g., querying databases or connecting to multiple APIs simultaneously).
Reasoning: The model reasons through multi-step workflows, leveraging its large context window to remember long-running conversation details or vast amounts of uploaded enterprise data.
Output: The agent provides fast, high-quality text-based responses or executes actions (like sending an email or updating a record) based on its reasoning.
Step-by-Step: How to Enable
As of the announcement, Grok 4.1 Fast is in preview and is off by default. It must be explicitly enabled by an administrator:
Step 1: Admin Opt-in: An organization administrator must log into the Copilot Studio Admin Center or Power Platform Admin Center.
Step 2: External Model Authorization: The admin must navigate to the settings for external language models and explicitly allow connection to xAI’s models.
Step 3: Region Verification: Ensure the environment is based in the United States, as early access is currently limited to US-based makers.
Step 4: Maker Selection: Once enabled by the admin, a maker opens an agent in Microsoft Copilot Studio, goes to Settings > Generative AI, and selects Grok 4.1 Fast from the dropdown menu of available models.
Step 5: Publish: The agent is saved and published with the new model as its reasoning engine.
Infographic: The Multi-Model Advantage
This table illustrates where Grok 4.1 Fast fits into the current Copilot Studio lineup:
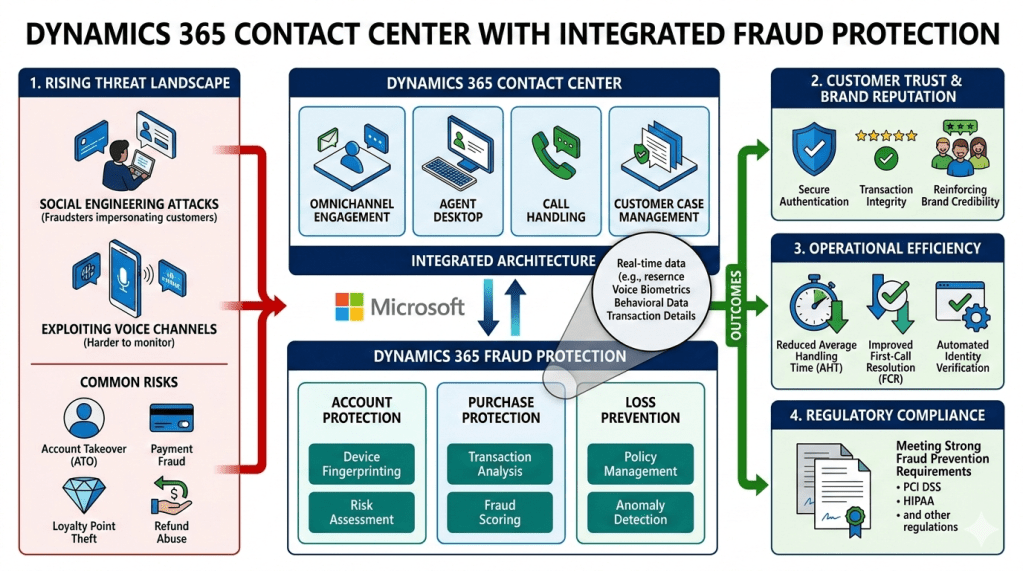
Contact centres are the beating heart of customer engagement. They handle millions of interactions daily across voice, chat, email, and digital channels. But with this central role comes vulnerability: fraudsters increasingly exploit contact centres as entry points for account takeovers, payment fraud, and identity theft.
Microsoft’s Dynamics 365 Fraud Protection offers a cloud-native solution to mitigate these risks. This paper explores why fraud protection is essential, how Dynamics 365 addresses it, and what licensing and SKUs are required to deploy it effectively.
2. The Growing Need for Fraud Protection
2.1 Fraud Trends in Contact Centres
Social Engineering: Fraudsters impersonate legitimate customers to gain access to accounts.
Synthetic Identities: Fake accounts created to exploit promotions or loyalty programs.
Account Takeover (ATO): Stolen credentials used to hijack customer accounts.
Refund Abuse: Exploiting return policies to gain financial advantage.
Payment Fraud: Unauthorized transactions processed through agents.
2.2 Impact on Organizations
Financial Losses: Billions lost annually to fraud in customer service channels.
Reputation Damage: Customers lose trust after a single breach.
Operational Strain: Agents spend more time verifying identities manually.
Regulatory Risk: Non-compliance with PCI DSS, GDPR, HIPAA, etc.
Microsoft’s Dynamics 365 Fraud Protection is a SaaS solution designed to safeguard organizations against fraud across digital and contact center channels.
3.1 Core Modules
Account Protection (AP)
Detects fraudulent account creation and login attempts.
Uses AI models to flag suspicious activity.
Purchase Protection (PP)
Evaluates online payment transactions for fraud risk.
Integrates with payment processors to reduce chargebacks.
Loss Prevention (LP)
Identifies fraud in returns, discounts, and loyalty programs.
Helps retailers and service providers reduce abuse.
3.2 Integration with Contact Centres
Seamlessly integrates with Dynamics 365 Contact Center.
Provides real-time fraud scoring during customer interactions.
Enhances Nuance voice biometrics for secure authentication.
Reduces manual verification workload for agents.
4. Licensing & SKU Requirements
Fraud Protection is not included in Dynamics 365 Premium or Contact Center licenses. It requires separate licensing.
4.1 Base License
Dynamics 365 Fraud Protection Base License
Includes Account Protection, Purchase Protection, and Loss Prevention.
Cost: $1,000/month/tenant
Transaction allowances:
100,000 Account Protection transactions/month
2,000 Purchase Protection transactions/month
4,000 Loss Prevention transactions/month
4.2 Add-ons
Add-on
Coverage
Cost (approx.)
Account Protection Add-on
20K transactions/month
$150/month (<2M transactions) or $100/month (≥2M transactions)
Training needs: Agents must understand fraud alerts to act effectively.
9. Conclusion
Fraud protection in contact centres is essential for security, compliance, and customer trust. Microsoft’s Dynamics 365 Fraud Protection provides a modular solution, but it requires separate licensing beyond the Premium license.
The base SKU costs $1,000/month per tenant, with add-ons available for scaling transaction volumes. Organizations must carefully plan licensing to balance cost and coverage.
By integrating Fraud Protection with Dynamics 365 Contact Center and Nuance AI, businesses can reduce fraud, improve efficiency, and protect customer trust.
This feature provides a standardized mechanism to measure, manage, and improve the performance and reliability of AI agents, moving them from “promising prototypes” to trustworthy production-ready tools.
Real-time User Journey
The user journey for a “Maker” (someone building the agent) follows a continuous feedback loop:
Defining the Goal: The maker identifies a scenario (e.g., an HR agent answering leave questions).
Inputting Realistic Data: Instead of perfect prompts, the maker uploads datasets reflecting messy, real-world user questions (vague phrasing, mixed intents).
Simulated Execution: Copilot Studio runs the agent against these prompts in a simulated environment using a specific User Identity (e.g., testing if a contractor accidentally sees full-time employee benefits).
Automated Grading: The system applies “Graders” to evaluate the responses based on Quality (completeness), Classification (behavior alignment), and Capability (using the right tool/topic).
Analysis & Refinement: The maker reviews aggregated trends to see high-level performance and drills down into specific failures to understand why the agent missed the mark.
Comparison: After making tweaks to instructions or data, the maker runs a new eval and compares it to the previous one to prove the agent is actually getting better.
Step-by-Step: How to Enable
Agent Evaluation is a built-in feature of Microsoft Copilot Studio. Here is how to set it up:
Step 1: Access the Evaluation Tab: Open your agent in Copilot Studio and navigate to the Evaluation section.
Step 2: Create a New Evaluation: Click to start a new evaluation run and give it a descriptive name.
Step 3: Upload Test Data: Import a dataset or manually enter a set of “Expected User Prompts.” You can also use AI-assisted generation to broaden your test coverage.
Step 4: Configure Graders: Select from ready-to-use logic (e.g., General Quality, Capability, or Correctness). You can combine multiple graders for one run.
Step 5: Set User Context: Select the user profile/identity under which the agent should be tested to validate permission-based data access.
Step 6: Run & Analyze: Execute the evaluation. Once finished, view the Dashboard for aggregated pass/fail rates and the Details tab for step-by-step logs.
Infographic: The 8-Step Confidence Loop
This visual summary represents the lifecycle of evaluating an AI agent:
AI Evaluation: The New Standard for Measuring Contact Center Excellence
(A comprehensive framework focused on measuring the performance of AI agents and human-AI collaboration using advanced metrics like reasoning accuracy and response latency.)
Real-time User Journey: The AI Audit Loop
This journey illustrates how a supervisor uses the AI Evaluation framework to ensure an autonomous agent is performing safely and effectively:
Autonomous Interaction: An AI agent handles a complex request regarding a “Warranty Exception” for a high-value customer.
Telemetry Capture: In real-time, the system captures not just what was said, but the Reasoning Path the AI used to decide to grant the exception.
Performance Evaluation: The Evaluation engine automatically scores the interaction based on the Three Pillars: Understand (Did it get the intent?), Reason (Was the logic sound?), and Respond (Was it fast and empathetic?).
Anomaly Detection: The framework flags the interaction because the Response Latency spiked to 1.2 seconds (above the 800ms threshold) during a specific logic branch.
Supervisor Review: The supervisor opens the Evaluation Dashboard. They see the “Reasoning Trace” and identify that the AI was stuck in a loop checking two conflicting internal policies.
Optimization: The supervisor adjusts the policy priority in Copilot Studio. The Evaluation framework then runs a “Synthetic Test” (a simulated call) to verify the fix before the agent goes live again.
Step-by-Step: How to Enable This Feature
The AI Evaluation tools are found within the Analytics and Insights section of the Dynamics 365 Contact Center.
Step 1: Access the Contact Center Admin Center
Sign in and navigate to Insights > Evaluation Framework.
Step 2: Define Evaluation Sets
Create a “Dataset” of representative customer interactions (both voice and text) that you want the AI to use as a benchmark for “Good” performance.
Step 3: Set “Three Pillar” Thresholds
Understand: Define the required Intent Recognition Accuracy (e.g., >90%).
Reason: Enable “Reasoning Tracing” to capture the AI’s step-by-step logic.
Respond: Set the Target Latency (e.g., <800ms) and Tone Consistency parameters.
Step 4: Enable Automated Quality Scoring
Toggle on Auto-Evaluation. This allows the AI to score 100% of interactions using the Quality Evaluation Agent (QEA) framework.
Step 5: Configure Synthetic Testing
In the evaluation settings, enable Simulated Conversations. This allows you to “test” your AI agents against a battery of predefined scenarios to measure performance before they interact with real customers.
Step 6: Deploy the Evaluation Dashboard
Add the AI Performance Insights report to your Power BI workspace to view real-time scores across your entire digital workforce.
Proactive voice engagements in Dynamics 365 Contact Center
(A shift from reactive support to proactive service, where AI agents initiate outbound voice calls to notify customers of critical updates, service disruptions, or personalized offers.)
Real-time User Journey: Anticipatory Service
This journey illustrates how the system prevents a customer from needing to call support by reaching out first:
Event Detection: An airline’s internal system flags that Flight 102 is delayed by four hours due to a technical issue.
Audience Segmentation: The Proactive Engagement Agent identifies all passengers on that flight who have not yet checked in or are currently in transit.
Autonomous Outreach: The AI agent initiates an outbound call to a passenger.
Natural Interaction: The passenger answers. Using HD Voices, the agent says: “Hi Alex, I’m calling from the airline. Your flight to Seattle has been delayed. I’ve already found a seat for you on the 6:00 PM departure. Would you like me to confirm that now?”
Interactive Resolution: The passenger agrees via voice. The agent updates the booking in the CRM and sends a new boarding pass via SMS.
Deflection Success: Because the airline reached out proactively, the passenger does not call the busy airport desk, reducing the “spike” in inbound volume for human agents.
Step-by-Step: How to Enable This Feature
Proactive voice requires configuration in both the Dynamics 365 Contact Center and Azure Communication Services.
Step 1: Configure Outbound Settings
In the Contact Center admin center, navigate to Channels > Voice. Ensure you have a validated outbound phone number and the appropriate telephony carrier settings.
Step 2: Define Proactive Triggers
Use Power Automate or Dataverse to set up a trigger. For example, “When a Flight Status changes to ‘Delayed’, trigger the Proactive Voice Flow.”
Step 3: Create the Voice Agent in Copilot Studio
Design the “Outbound Conversation” topic in Microsoft Copilot Studio. Specifically, select an HD Voice and draft the script using variables (like {CustomerName} and {FlightNumber}) for personalization.
Step 4: Enable “Proactive Outreach” in Settings
In the Bot settings, navigate to Proactive Engagements and toggle the feature to On. Map your Copilot bot to the outbound voice channel.
Step 5: Set Governance & Quiet Hours
Configure “Quiet Hours” (e.g., no proactive calls between 9:00 PM and 8:00 AM) and “Frequency Caps” to ensure customers aren’t overwhelmed by automated calls.
Step 6: Launch and Monitor
Publish the bot. Use the Agent Activity Feed to monitor the success rate and customer responses to these proactive calls in real-time.