
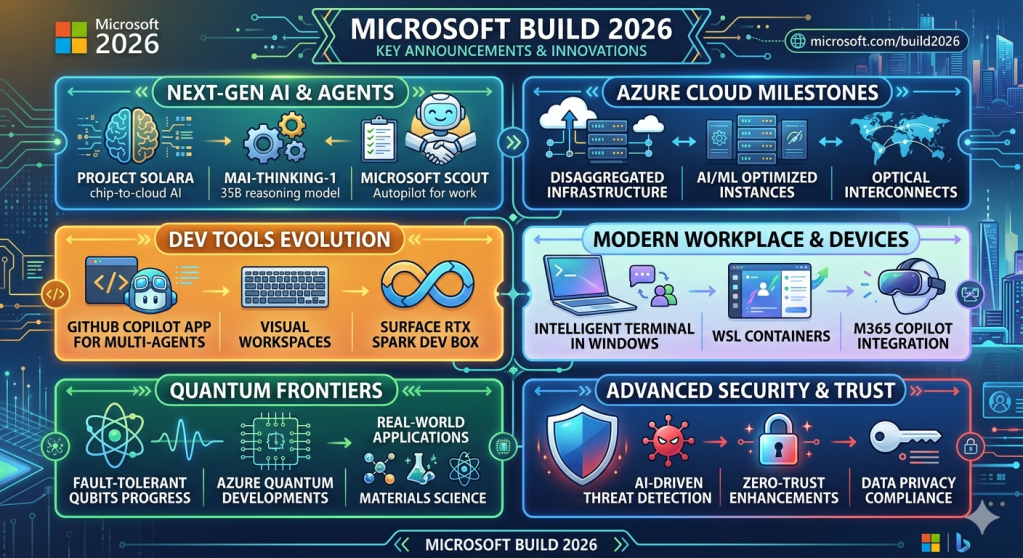
Microsoft Build 2026, held from June 2nd to June 3rd both online and in San Francisco, marked a monumental shift in the technology landscape. For the past several years, the developer ecosystem has been relentlessly focused on the foundational capabilities of large language models, the integration of conversational copilots, and the iterative improvements in generative AI outputs. However, the narrative emerging from this year’s developer conference has fundamentally altered that trajectory. Microsoft has officially declared the end of the passive chatbot era and the dawn of the agentic operating model. This paradigm shift involves intelligent agents performing tangible, proactive work across codebases, data repositories, cloud infrastructure, and operational security boundaries.
The tech world has seen several paradigm shifts, and the move toward pervasive, agentic AI is arguably the biggest yet. Microsoft’s 2026 Build conference laid this clearly on the table for developers: it’s not just about playing with AI and standalone chatbots anymore. It’s about building, managing, and governing long-running agentic systems that can reliably execute complex, real-world workflows at scale. Build 2026 presented a detailed roadmap for the future of business software. Below is a breakdown of the most important announcements, strategy shifts, and technological advancements that marked the 2026 Microsoft Build.
1. The Enterprise AI Shift: Emancipation and the Pursuit of Superintelligence
The most impactful announcement at Build 2026 wasn’t a product but a strategic confession from Microsoft’s AI chief, Mustafa Suleyman. While the public narrative has often painted Microsoft as being in direct competition with consumer-focused tech giants Suleyman revealed that his “superintelligence” team is primarily focused on AI research. “We were only sort of set free from our contract with OpenAI about six months ago to formally pursue superintelligence,” Suleyman stated. He emphasized that while these are very early days for the initiative, the mandate is clear.
The Wake-up Call of “Cowork”:
The year saw Anthropic release “Cowork,” an AI that allows users to automate tasks and generate code without having prior programming experience. Its release caused a substantial sell-off in Microsoft shares, plummeting 10% due to fears that Anthropic’s new tool would disrupt established enterprise software platforms.
According to Suleyman, Anthropic’s direct challenge to the corporate world with its advanced development tools poses a far greater threat to Microsoft’s core business than consumer chatbots do. “We’re more focused on the Anthropic-style which is enterprise [use cases], developers and coding. That’s the journey we’ve been on,” he stated.
The Drive Toward Autonomy:
Microsoft is now accelerating its quest for true self-sufficiency. While maintaining a reformed, $30 billion cloud partnership with OpenAI (holding a 27% stake and guaranteed access until 2032), the company is investing heavily in its own internal AI models. This hybrid approach (partnering with OpenAI while concurrently investing $5 billion in Anthropic and building its own tech under Suleyman) highlights Microsoft’s determination to lead in the “thinking and coding” agent domain, an area focused on developing intelligent agents that can autonomously execute complex, multi-step business processes.
2. Intelligence Embedded in Context: Introducing Microsoft Agent Platform and Microsoft IQ
The race to move AI from experimental to operational has hit a wall: context. Raw model performance is no longer the bottleneck, but rather how an agent comprehends the specifics of a business, accesses trustworthy internal knowledge, and adheres to appropriate governance constraints.
To tackle this, Microsoft unveiled Microsoft IQ, an enterprise intelligence layer that provides Copilots and agentic systems with a shared, evolving understanding of how an organization functions. Microsoft IQ integrates data from across an entire customer’s Microsoft environment and is divided into four categories:
Work IQ
Slated for general release on June 16, 2026, Work IQ injects workplace intelligence into agents by building semantic understanding of emails, calendars, meetings, chats, documents and internal business applications. Its set of APIs (covering Chat, Context, Tools, and Workspaces) allow for production-ready interaction between agents and M365 data, within the strict boundaries of M365 tenant trust, ensuring all actions are auditable and discoverable.
Fabric IQ
Generally available today, Fabric IQ maps the data operations of a business. It imbues semantic meaning into relationships between entities like customers, orders, revenue and products, and ensures consistency regardless of where that data lives, be it in ERP or CRM systems.
Foundry IQ
Foundry IQ allows agents to discover and reuse knowledge found in a diverse range of enterprise data sources, custom applications and internal web pages.
Web IQ
The new standard for AI grounding, Web IQ combines proprietary enterprise data with real-time information from the internet, enabling enterprise agents to reconcile internal knowledge with current world events.
By consolidating these data points, the Microsoft Agent Platform enables developers to build governed, enterprise-ready bots on GitHub and deploy them through Microsoft Foundry with automatic optimization.
3. The New MAI Family: Homegrown AI Models for Choice
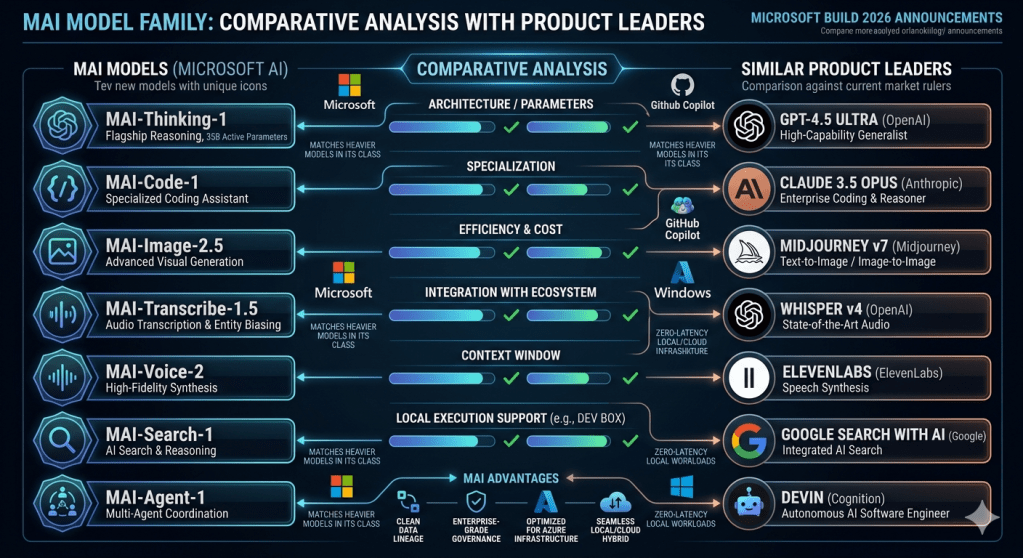
To empower this new paradigm of agentic software, Microsoft introduced its new set of seven internal AI models, branded under the “MAI” (Microsoft AI) umbrella, designed to give developers unparalleled choice across the entire tech stack.
Advanced Reasoning and Coding:
In direct response to Anthropic’s Opus 4.6, Microsoft revealed an advanced reasoning model that rivals enterprise-level coding capabilities. Additionally, an ultra-efficient model for coding has been specifically fine-tuned for the GitHub developer platform to improve the speed, cost, and reliability of code generation.
Microsoft announced a comprehensive suite of seven new AI models, engineered completely in-house by the AI Superintelligence Team. Branded under the “MAI” nomenclature, these models span a wide array of specialized capabilities, including reasoning, code generation, image creation, transcription, and voice synthesis.
At the apex of this new ecosystem sits MAI-Thinking-1. This model represents Microsoft’s most ambitious proprietary release, featuring a 35-billion-active-parameter architecture explicitly engineered for long-context reasoning, executing multi-step instructions, and performing advanced code generation. Microsoft deliberately built this model from the ground up using enterprise-grade, commercially licensed data. By abstaining from the controversial practice of relying on outputs generated by other leading competitive AI models, Microsoft ensured a pristine data lineage. This strategic data sourcing methodology significantly improves operational efficiency while simultaneously reducing the computing costs associated with running massive enterprise inferences. Microsoft claims that MAI-Thinking-1 successfully matches other leading, heavier models in its weight class across key software and operational benchmarks.
Expanding the MAI Portfolio
Alongside the flagship reasoning model, Microsoft introduced a diverse array of specialized, modality-specific models:
- MAI-Image-2.5: A next-generation visual generation model.
- MAI-Voice-2: A high-fidelity voice synthesis engine.
- MAI-Transcribe-1.5: An advanced audio-to-text transcription model.
- MAI-Code-1: A specialized coding assistant model.
This multi-model approach allows enterprise customers and developers to select the exact right size, latency, and modality for their specific architectural needs, ensuring that developers do not have to rely on a massive, expensive generalist model for simple, highly specialized tasks.
4. The agentic app backend with Microsoft Fabric and databases
AI is changing how we do things – with the proportion of workers shifting from asking questions to giving whole tasks to multi-agent systems. This need a reliable and scalable data foundation. During the Build 2026 Microsoft announced major updates to its database infrastructure and Microsoft Fabric. The developer workflow is becoming entirely centralized. The GitHub Copilot app has now officially become the primary control center for all agentic development processes. Simultaneously, Microsoft Foundry has significantly matured, transitioning from an experimental platform into a hardened, production-grade agent deployment environment.
Rayfin: Redefining the Application Backend
To bridge the gap between AI prototyping and robust enterprise deployment, Microsoft unveiled Rayfin. Rayfin is strategically targeted at creating prompt-to-production enterprise application backends. Within the Rayfin framework, foundational data models live entirely as code, and data access policies become fully programmable entities.
Crucially, all application data managed through Rayfin seamlessly lands in Microsoft’s OneLake repository, while Fabric provides the underlying enterprise scale and security architecture. This integration ensures that highly automated, GitHub-based CI/CD workflows can efficiently drive structural changes to complex backend data systems.
Azure HorizonDB and Cosmos DB: The Data Layer of the AI Era
A foundational element of AI applications is robust, scalable PostgreSQL infrastructure. To dominate this space, Microsoft introduced Azure HorizonDB. This new database architecture completely brings PostgreSQL into the modern AI application era.
Azure HorizonDB is built with extreme reliability and scale in mind. It features zone resilience as a default characteristic. The storage architecture is massively elastic, capable of scaling up to an astounding 128 TB of capacity. On the compute side, it offers scale-out capabilities reaching up to 3,072 vCores, allowing it to handle virtually any throughput demand. Furthermore, Azure HorizonDB features deeply integrated vector search functionalities, native AI model management, and seamless operational connectivity directly to Microsoft Foundry and Fabric.
Complementing HorizonDB, Microsoft also announced significant improvements to Azure Cosmos DB. These improvements are specifically tailored to enhance local development experiences and optimize the long-term memory of AI agents. The Cosmos DB updates drastically shorten developer feedback loops and actively reduce the dependency on live cloud connections during local testing. This approach improves execution repeatability across diverse developer environments and automated build agents, enabling engineers to identify and resolve data access issues far earlier in the software development lifecycle.
5. Securing the Agentic Enterprise with MDASH
As the volume of AI-generated code explodes and software delivery speeds increase exponentially, the traditional models of application security (AppSec) are rapidly becoming obsolete. Microsoft directly addressed this critical vulnerability gap with the introduction of MDASH (Microsoft Security multi-model agentic scanning harness).
The fundamental premise of MDASH is that the AI era requires AI-native security tooling. Microsoft openly acknowledged that in the immediate future, organizations must expect vastly more code to be both generated and reviewed by artificial intelligence. Concurrently, malicious threat actors are guaranteed to utilize these exact same advanced models to discover zero-day exploits and orchestrate complex attacks.
MDASH is designed to raise the bar for enterprise AppSec by deploying agentic security systems to fight back. The platform mandates and heavily invests in highly automated code reviews, rigorous programmatic policy enforcement, isolated sandboxing environments, and continuous exploitability analysis. The goal of MDASH is not to replace the human security engineer, but rather to elevate them. By automating the repetitive, lower-tier triage and discovery phases, MDASH ensures that human security professionals remain in the loop solely for making complex, nuanced risk decisions rather than wasting time on manual vulnerability hunting.
6. Accelerating Human Progress: Scientific Discovery and the Quantum Leap
While enterprise SaaS, developer tools, and operational security dominate the corporate dialogue, Microsoft utilized the final stages of Build 2026 to showcase how its compute infrastructure is actively solving fundamental challenges in global science and advanced physics.
Microsoft Discovery: Automating the Scientific Method
Microsoft announced the general availability of Microsoft Discovery, an entirely new class of enterprise-grade, agentic AI platform built natively on Azure. The explicit purpose of Microsoft Discovery is to fundamentally alter how research and development is conducted, expanding what individual scientists can achieve by applying agentic workflows across the entire scientific process.
The platform is already demonstrating massive, real-world utility across major global corporations:
- BHP is actively deploying Microsoft Discovery to accelerate the identification of novel copper-leaching solutions, reducing research timelines from several years down to mere months.
- Syensqo is utilizing the platform to vastly accelerate complex semiconductor research and development.
- GSK is deploying these agentic systems to rapidly iterate on advanced pharmaceutical drug discovery processes.
To democratize this profound capability beyond the Fortune 500, Microsoft also launched a free Discovery local app tailored for the broader scientific community. Currently available in public preview, this localized application provides immense research capabilities to academic institutions and independent researchers, requiring nothing more than a standard GitHub Copilot account to access.
The Quantum Milestone: Majorana 2
In perhaps the most technically astounding hardware announcement of the conference, Microsoft unveiled Majorana 2, its next-generation quantum computing chip. While quantum computing has historically been characterized by slow, incremental progress, Majorana 2 represents a literal giant step toward true commercial scale.
The technical specifications of the chip represent a paradigm shift in physics engineering. The Majorana 2 chip achieves an astonishing average qubit lifetime of 20 seconds, with specific instances sustaining stability for up to a full minute. This architectural breakthrough provides a 1,000x increase in reliability when compared to Microsoft’s previous generation of quantum hardware. Furthermore, Microsoft has established a clear, viable engineering path to placing one million functional qubits onto a single chip that physically fits within the palm of a hand.
The integration of artificial intelligence is central to this timeline. Microsoft confidently declared that by heavily utilizing agentic AI to optimize physics models and hardware designs, the company is firmly on track to deliver a fully scalable, commercially viable quantum machine by the year 2029.
7. The Agentic Revolution: Moving Beyond the Prompt
The central thesis of Build 2026 was the transition from reactive AI to proactive, agentic AI. Microsoft unveiled two massive initiatives designed to materialize this vision: Project Solara and Microsoft Scout.
Project Solara: Rethinking Chip-to-Cloud Interactivity
Perhaps the most visually striking and forward-looking announcement was Project Solara. Positioned as a completely new chip-to-cloud platform, Project Solara is engineered exclusively for the operational needs of AI agents. Microsoft’s core objective with this platform is to radically reduce the cost and friction associated with creating AI-powered, custom-built devices across various industries and enterprise use cases.
To demonstrate the practical application of this platform, Microsoft unveiled two distinct prototype reference devices:
- The Project Solara Badge Device: Powered by cutting-edge Qualcomm technology, this wearable badge represents a fundamental reimagining of mobile productivity. It acts as a reference design for on-the-go, agent-first interaction, allowing a user to communicate hands-free with their AI agents while traveling or moving between corporate meetings.
- The Project Solara Desk Device: Leveraging MediaTek silicon, this prototype functions as an ever-present desktop companion. It acts as an always-available ambient AI assistant that maintains continuous awareness of a user’s schedule, ongoing tasks, and immediate workflow context.
Project Solara highlights Microsoft’s philosophical belief that the future of computing will not be bound to conventional screens or singular applications. Instead, computing will manifest as intelligent agents operating seamlessly and contextually across dynamically shifting physical and digital environments.
Microsoft Scout: The Autopilot for Corporate Workflows
Transitioning from hardware to pure software, Microsoft introduced Microsoft Scout, officially characterized as the company’s first “Autopilot agent for work”. Scout represents a massive departure from the standard “Copilot” model. Instead of relying on a human user to perpetually enter conversational prompts, Scout is explicitly designed to operate silently and proactively in the background, continuously managing daily tasks.
Scout is built upon the open-source OpenClaw technological foundation. It is intellectually driven by the Work IQ context engine, which allows the agent to intrinsically understand and navigate the user’s specific corporate environment. The Work IQ APIs are essential here, as they make profound layers of Microsoft 365 context natively available to these agents. This means Scout can fluidly traverse Microsoft Teams, Outlook, OneDrive, and SharePoint, while simultaneously executing local actions directly on the user’s local machine hardware.
The operational capabilities of Scout are immense. Microsoft detailed that Scout can autonomously track complex, multi-stage projects, proactively identify and resolve calendar scheduling conflicts, aggregate data to prepare comprehensive meeting briefs, and independently handle a myriad of routine workplace activities on behalf of its human counterpart.
Crucially, Microsoft has preemptively addressed the massive security implications of autonomous corporate agents. Every individual AI agent deployed through Microsoft Scout is assigned its own unique Entra identity. This profound architectural decision ensures that enterprise IT organizations can comprehensively monitor exactly what data an agent is accessing and enforce strict governance over the administrative actions it is permitted to execute. Microsoft is currently rolling out Scout on an experimental, highly controlled basis to selected Frontier organizations situated in the United States.
8. Hardware Innovations: Localizing the AI Workload
While cloud infrastructure remains Microsoft’s financial bedrock, Build 2026 clearly demonstrated that local, edge-based computational power is vital for the agentic future, leading to significant hardware unveilings.
The Surface RTX Spark Dev Box
For developers requiring immense localized power, Microsoft introduced the Surface RTX Spark Dev Box. This is a highly specialized, compact desktop workstation meticulously powered by Nvidia’s advanced RTX Spark silicon. The performance metrics of this machine are staggering for its form factor; it delivers up to one full petaflop of raw AI processing performance and boasts up to 128GB of unified system memory.
The strategic purpose of the Surface RTX Spark Dev Box is to enable developers to execute massive AI workloads locally without continuous reliance on the cloud. Microsoft stated that the device is fully capable of running colossal AI models containing up to 120 billion parameters natively on the local hardware. This makes the machine an unprecedented tool for high-intensity developer tasks such as local model fine-tuning, operating complex agentic AI workflows, and running demanding development pipelines that require zero-latency execution.
The Evolution of the Windows Platform
Microsoft explicitly focused on transforming Windows 11 into the premier environment for modern, AI-first software engineering, ensuring developers can choose seamlessly between local computing and the cloud. Several core Windows updates were announced to facilitate this:
- Expanded Windows AI APIs: Empowering developers to integrate deeper system-level intelligence into their applications.
- Native Coreutils: Microsoft is now making Linux-like command line utilities (Coreutils) run natively on Windows and broadly available to the public.
- WSL Containers: Nearing public preview, this built-in utility provides a native way to create, orchestrate, and interact with Linux containers entirely through familiar CLI and API interfaces directly within Windows.
- Intelligent Terminal: The command line experience has been reimagined with an Intelligent Terminal that intentionally brings context-aware assistance directly to the prompt.
- Windows Development Skills: Now generally available, these tools grant autonomous agents the structured, programmatic knowledge required to build highly native Windows applications from end to end using WinUI3 skills alongside the WinApp CLI.
- OpenClaw Support: Bringing native support for the open-source OpenClaw framework directly to the Windows operating system.
Furthermore, to manage this new agentic workforce securely, Microsoft introduced Windows 365 for Agents. This paradigm-shifting concept provides autonomous AI agents with their own fully managed Cloud PCs. This allows organizations to host, monitor, and provision compute resources for non-human workers just as they would for human employees. To augment local security, Microsoft Execution Containers were announced, bringing rigorous, OS-level isolation and containment to local agents running on a developer’s machine.
Conclusion
Build 2026 will be known as the point when Microsoft cemented itself in the conversation about what the real-world application of AI will look like.
By making such ambitious moves into enterprise applications directly challenging companies like Anthropic, Microsoft has declared its intentions. Microsoft IQ is a necessary layer of contextual data that provides agents with the essential foundation it needs, while the range of MAI models offer a wide range of performance tailored options for the developer community. The leaps in infrastructure and databases, ranging from Fabric to Rayfin and Azure HorizonDB, prove the building blocks are now in place for an agentic world, with an emphasis on a seamlessly integrated security layer including MDASH and Defender.
Add in the capabilities of the Discovery Engine to accelerate scientific research and the implications of the Majorana 2 quantum chip and the overall vision from Microsoft is clear: an entire ecosystem for intelligent computing designed for the modern developer who requires freedom to build and security of enterprise grade trust.
References
https://blogs.microsoft.com/blog/2026/06/02/microsoft-build-2026-be-yourself-at-work
https://partner.microsoft.com/pt-pt/blog/article/microsoft-build-2026-recap
