
Uncategorized

Dynamics 365 Sales Product Catalog

The Dynamics 365 product catalog consists of four components:
● Unit groups: A unit group defines how a product is packaged for sale. Among other values, it defines the units of measure that the product or service is sold in. For example, an organization that sells gaming systems might sell them individually on a crate that includes 12 individual gaming systems. An organization that provides services to customers might sell their services in increments of hours, days, or weeks.
● Products: A product represents the type of product that a company might keep in inventory, a product that’s custom-built, or a service that’s provided to a customer. For example, a beauty salon’s product list might include different hairstyling products and also services like haircuts, hair coloring, and spa services.
● Price lists: A price list is a set of prices that are charged for products under specific circumstances. For example, an organization might have multiple price lists to accommodate seasonal variations, specials, or the different markets that the organization sells to (like government, commercial, and education).
● Discount lists: A discount list lets organizations offer products or services at different prices, depending on the quantity that’s bought. For example, a small vendor that buys five TVs to sell in its store might pay $350.00 per TV, whereas a large vendor that buys 500 TVs to sell in multiple locations might pay $300.00 per TV.

Of all the components in the preceding list, only discount lists aren’t required. All other components must be set up for any organization that will use the product catalog.

Because of the way that units, discounts, and prices are linked, it’s important that you create the components in a product catalog in the following order.
Uncategorized

Microsoft Dynamics Sure Step

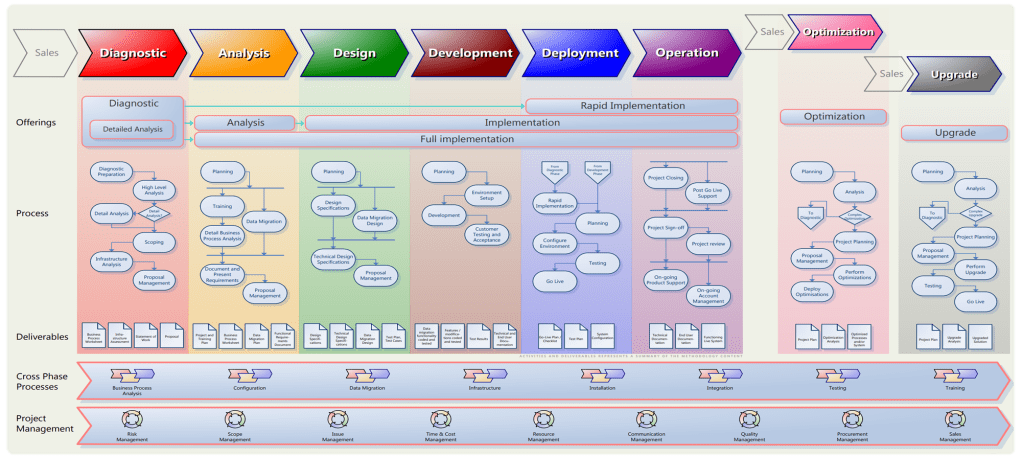
It is a best practice recommended by Microsoft. The Sure Step methodology is divided into the following phases:

PhaseTasks during phase
DiagnosticEvaluate a customer’s business processes and infrastructureAssist the customer with their due diligence cycle, including ascertaining requirements and their fit with the solution, and assessing the resource needs for the solution deliveryPrepare the project plan, proposal, and the Statement of Work
AnalysisAnalyze current business model and finalize the Functional Requirements documentFinalize the fit-gap analysisDevelop the Environment Specification documentation
DesignDevelop the Functional Design, Technical Design, and Solution Design documentsFinalize the data migration designEstablish test criteria
DevelopmentFinalize configurations and setup of the standard solutionDevelop and finalize the custom code that is required to support the solutionConduct functional and feature testing of the solutionCreate the user training documentation
DeploymentSet up the production environmentMigrate data to the production environmentConduct user acceptance test of the systemTrain users and finalize the user documentationConduct go-live check and promote the system to production
OperationResolve pending issuesFinalize user documentation and knowledge transferConduct a post-mortem of the projectProvide on-going support (activities that continue through any future involvement with the customer after the project is closed)

The Sure Step methodology also provides guidance for the following areas:

Activity areaActions performed
OptimizationLeverage Review Offerings to determine proactively if the system is being designed and delivered optimally to meet the customer’s requirementsAnalyze the system to determine how it can be optimized for the best performance based on customer’s needs
UpgradeAssess the customer’s current business processes and solutionDocument the requirements for new functionalityUpgrade the system to new release—including the addition of new functionality, promotion of existing customizations that are required, and elimination of custom code no longer required

Please refer below diagram which clearly specifies the Sure Step Processes and phases –

Uncategorized

Currencies in Dynamics 365 Sales

Currencies determine the prices for products in the product catalog and the cost of transactions, such as sales orders. If your customers are spread across geographies, add their currencies to manage your transactions. Add the currencies that are most appropriate for your current and future business needs. Dynamics 365 supports multiple currencies.
When setting up your currency settings, you can customize the following information:
●Currency type: Which currency, or currencies, you’d like to use.
●Currency code: Short form of the currency (for example, USD for United States Dollar).
●Currency precision: Number of decimals you want to use for the currency. You can add a value between 0 and 4.
●Currency name: Unless you selected a custom currency for “Currency type”, this column will automatically be filled.
●Currency symbol: Unless you selected a custom currency for “Currency type”, this column will automatically be filled.
●Currency conversion: The value of the selected currency in terms of 1 US dollar. Make sure to update this value frequently as required to avoid inaccurate calculations in your transactions.

In multi currency solution we need to configure below components –

1. Base Currency

2. Transaction Currency

3. Exchange Rates

Uncategorized

Power Apps August 2022 Feature Update

A variety of new and highly anticipated features are now available as under-

Trust

  • Build apps across multiple tenants with Azure B2B maker
  • Improved Canvas App monitoring with Experimental Application Insights Features
  • ESLint rules for Power Apps and Dynamics 365
  • Creating canvas apps as Dataverse solutions by default

Maker Productivity

  • Table designer now in preview in the canvas and model-driven app designers
  • Automatically create a Power App from a REST API
  • Modern command bar in Canvas
  • Install Apps via Power Platform CLI & Install API

Please refer below link for more information –

Uncategorized

Access Levels in Dynamics CE

The access levels show the level at which a user can interact with rows within a given table. The portion of the circle filled illustrates the levels. The levels are None, User, Business Unit, Parent-Child Business Unit, and Organization. You need to click in the circle to change the level. Each click with change the fill and/or color. Click in the circle until it is the level desired is selected.
● User level (basic): This gives a user access to rows that the user owns or anything shared with the user or team that the user belongs to. You would want to use this setting if you want the user only to access their own rows. You would not want salespeople to be able to delete other sales people’s accounts or leads.
● Business Unit (local): This allows access to the data of other users in a business unit. A business unit has to be setup within Dynamics 365 and can be a hierarchy of a department. Sales managers would want to see all his/her subordinates’ rows
● Parent-Child Business Units (deep): This will give the user access to all the business units they belong to along with any business units that are subordinate to the user’s business unit.
● Organizational (global): This user has access to all the rows in the organization. If you have a Salesperson able to add products from any level of the organization, you would want him to have access to all the organizational products and not just the ones available for his business unit.