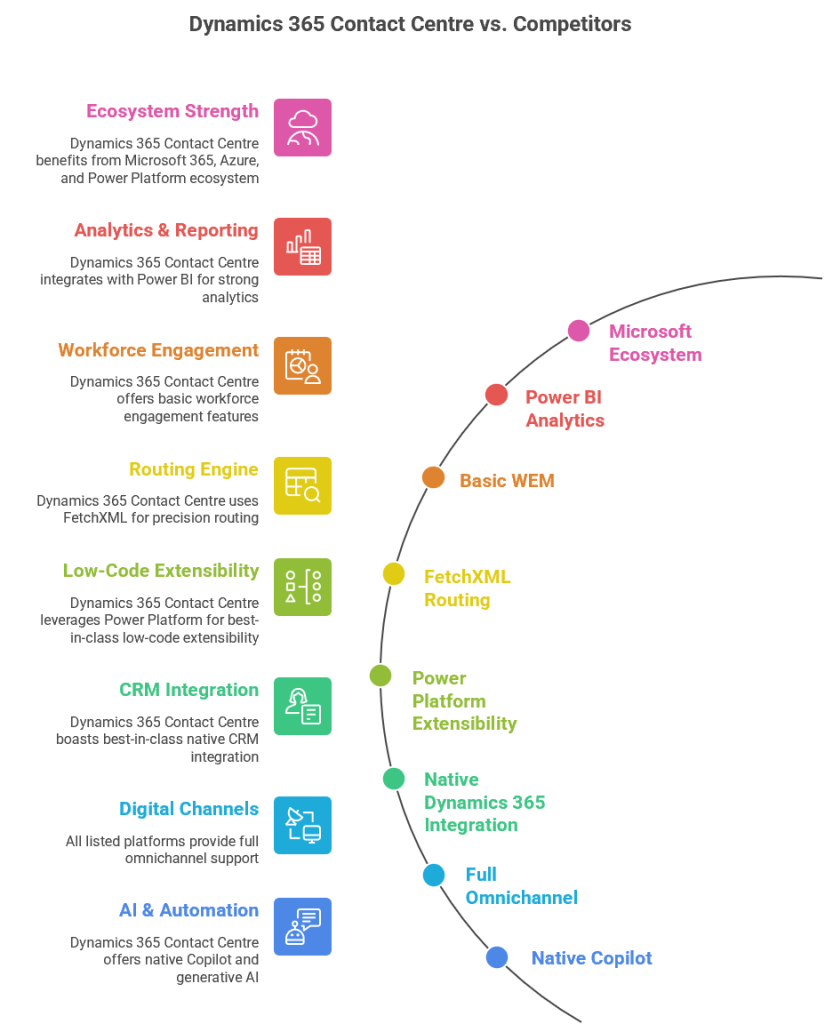
architecture, contact-centre, copilot-studio, Customer Experience, Customer-service, Power Apps

Step‑by‑step project delivery life cycle for Dynamics 365 & Power Platform projects

Here’s a step‑by‑step project delivery life cycle for Dynamics 365 & Power Platform projects, mapped to both SDLC (Software Development Life Cycle) and STLC (Software Testing Life Cycle). I’ve structured it so you can use it as a governance framework or a delivery playbook.

Dynamics 365 & Power Platform Project Delivery Life Cycle

1. Initiation & Planning

  • SDLC:
    • Define business objectives, scope, and success criteria.
    • Identify stakeholders, governance model, and compliance requirements.
    • Conduct feasibility study and ROI analysis.
  • STLC:
    • Define test strategy aligned with business goals.
    • Identify quality metrics, compliance standards, and risk areas.

2. Requirements & Analysis

  • SDLC:
    • Gather functional and non‑functional requirements (workshops, interviews, user stories).
    • Map business processes to Dynamics 365 modules and Power Platform capabilities.
    • Define integration points (ERP, CRM, CTI, external APIs).
    • Create requirement traceability matrix.
  • STLC:
    • Review requirements for testability.
    • Define acceptance criteria and test conditions.
    • Draft high‑level test scenarios.

3. Solution & Architecture Design

  • SDLC:
    • Design system architecture (Dataverse, Power Apps, Power Automate, Power BI, Dynamics 365 modules).
    • Define security, compliance, and governance frameworks.
    • Create ALM (Application Lifecycle Management) plan with environments (Dev, Test, UAT, Prod).
    • Prepare architecture maps and integration diagrams.
  • STLC:
    • Design test environment architecture.
    • Define test data strategy (synthetic vs. masked production data).
    • Plan automation framework (e.g., EasyRepro, Selenium, Power Automate test flows).

4. Development & Configuration

  • SDLC:
    • Configure Dynamics 365 entities, forms, workflows, and business rules.
    • Build Power Apps (Canvas/Model‑Driven), Power Automate flows, and custom connectors.
    • Implement integrations (Azure Functions, Logic Apps, APIs).
    • Follow coding standards, version control (GitHub/Azure DevOps), and CI/CD pipelines.
  • STLC:
    • Prepare unit test cases.
    • Conduct developer testing (unit, integration).
    • Automate regression test scripts.

5. Testing & Quality Assurance

  • SDLC:
    • Conduct system testing, UAT, performance testing, and security validation.
    • Validate integrations and data migration.
  • STLC:
    • Test Planning: Finalize test plan, entry/exit criteria.
    • Test Design: Create detailed test cases, test scripts, and data sets.
    • Test Execution: Run functional, regression, performance, and security tests.
    • Defect Management: Log, track, and resolve defects in Azure DevOps/Jira.
    • Test Closure: Document results, lessons learned, and sign‑off.

6. Deployment & Release Management

  • SDLC:
    • Execute release plan with governance approvals.
    • Deploy via managed solutions, pipelines, or release automation.
    • Conduct cutover activities (data migration, user provisioning, environment setup).
  • STLC:
    • Validate deployment in production.
    • Conduct smoke testing and sanity checks.
    • Confirm rollback strategy readiness.

7. Training & Change Management

  • SDLC:
    • Deliver end‑user training, admin training, and governance workshops.
    • Provide documentation (user guides, SOPs, governance playbooks).
    • Manage adoption with change champions and feedback loops.
  • STLC:
    • Validate training effectiveness with UAT feedback.
    • Ensure test cases reflect real‑world scenarios.

8. Operations & Continuous Improvement

  • SDLC:
    • Transition to support (L1, L2, L3).
    • Monitor system health, performance, and compliance.
    • Implement enhancements via backlog grooming.
  • STLC:
    • Conduct regression testing for patches and upgrades.
    • Maintain automated test suites for continuous validation.
    • Periodic audits for compliance and data integrity.

This framework ensures governance, compliance, and quality assurance are embedded throughout delivery. It’s especially powerful for Dynamics 365 & Power Platform projects where configuration, low‑code development, and integrations coexist with enterprise‑grade testing.

AI Foundry, architecture, copilot-studio

What’s New in Copilot Studio: September 2025 – Expanding Reach, Automation, and Analytics

What’s New in Copilot Studio: September 2025 – Expanding Reach, Automation, and Analytics

The September updates focused on three core areas: building richer agent experiences (specifically via Computer Use and WhatsApp), advanced developer tools like Code Interpreter, and deeper ROI/Analytics for measuring business impact.

Real-time User Journey: Computer Use (Public Preview)

The most innovative journey introduced is the ability for an agent to interact with UIs like a human:

  1. Scenario Discovery: A user needs to enter data into an old legacy desktop application that doesn’t have an API.
  2. Instruction: The user tells the agent, “Open the legacy ERP, look up invoice #123, and copy the total into this Excel sheet.”
  3. Vision & Reasoning: The agent uses its “vision” to see the screen and its “reasoning” to identify buttons and text fields.
  4. Execution: On a hosted Windows 365 browser or local device, the agent moves the virtual mouse, clicks, and types to complete the task.
  5. Completion: The agent confirms the data has been moved and provides a screenshot or log of the completed action.

Step-by-Step: How to Enable WhatsApp (General Availability)

With WhatsApp integration now GA, you can deploy agents to customers globally:

  • Step 1: Prerequisites: Ensure you have a Meta Business Account and a verified phone number for WhatsApp.
  • Step 2: Access Channels: In Copilot Studio, open your agent and go to the Channels tab.
  • Step 3: Select WhatsApp: Choose WhatsApp from the list of available channels.
  • Step 4: Connect to Meta: Follow the guided wizard to link your Copilot Studio agent to your Meta Business Manager.
  • Step 5: Configure Interactions: Set up how the agent should handle attachments (images/files) and authentication (via phone number).
  • Step 6: Go Live: Once connected, your agent is accessible to anyone messaging that verified WhatsApp number.

Infographic: Scaling and Measuring AI Impact

The September update introduced a suite of “Enterprise-Ready” tools to manage agents at scale:

CapabilityWhat it DoesBusiness Value
Code Interpreter (GA)Executes Python code directly within agents.Solves complex math, data visualizations, and CRUD operations on Dataverse.
ROI Analysis (GA)Tracks savings in time or money per agent run.Provides real-time data to justify AI investment and prioritize projects.
File Groups (GA)Organizes up to 12,000 files into 25 groups.Improves knowledge retrieval accuracy and reduces “context chaos.”
Agents Client SDKEmbeds agents in native Android, iOS, or Windows apps.Keeps users in their flow of work without switching to Teams or Web.

References

AI Foundry, contact-centre, copilot-studio, Customer-service, Power Apps

Microsoft Power Platform: Leading the Agentic Transformation of Low-Code Development

The primary focus is Microsoft’s leadership in the LCAP market for the seventh consecutive year, emphasizing the integration of Agentic AI, Generative Pages, and Professional Developer Tools within a fully governed environment.

Real-time User Journey: “Vibe-Coding” & Agentic Assistance

The journey described in the 2025 landscape moves from building static apps to orchestrating intelligent solutions:

  1. Visionary Starting Point: A business user identifies a complex problem (e.g., global inventory rebalancing).
  2. AI-Guided Design (Plans): The user uses Plans in Power Apps to describe the problem. AI generates a solution blueprint, including data models and logic.
  3. Vibe-Coding (Generative Pages): The user uses natural language to “vibe-code” the interface. The AI creates modern, responsive pages instantly, removing the need for manual UI building.
  4. Agent Integration: The maker adds an Agent into the app. This agent doesn’t just display data; it proactively explores it and assists the end-user with complex data entry.
  5. Collaborative Use: An end-user opens the app and interacts with the Agent Feed, a central hub for human-agent collaboration, to resolve inventory discrepancies.

Step-by-Step: How to Enable Agentic Capabilities

To take advantage of the features highlighted in the Gartner report (like Plans and Agents):

  • Step 1: Access Power Apps Studio: Sign in to make.powerapps.com.
  • Step 2: Start with “Plans”: Instead of starting from a blank screen, select the “Describe to build” or “Start with a Plan” option on the home screen.
  • Step 3: Enable Copilot: Ensure the Copilot component is enabled in your environment settings (managed via the Power Platform Admin Center).
  • Step 4: Create Generative Pages: Within the app designer, use the “New Page” menu and select “Generative Page” to build UI using natural language prompts.
  • Step 5: Add an Agent: Go to the Knowledge or Agents tab within the app studio to configure a built-in assistant that will help end-users navigate the app.
  • Step 6: Publish & Govern: Publish the app to your organization. Admins should use the Managed Platform settings in the Admin Center to monitor usage and secure data via Data Loss Prevention (DLP) policies.

Infographic: The 2025 Power Platform Pillars

The Gartner report recognition is built on these three strategic differentiators:

PillarFeature / CapabilityBusiness Outcome
Agentic AIPlans in Power Apps & Agent Feed30% faster data entry and higher success for new builders.
Enterprise ScaleSingle Admin Center & Azure FoundationConfident global scaling with Managed Identities and VNet support.
Pro-Dev IntegrationNative Visual Studio Code & Custom ConnectorsSeamless “Fusion Team” collaboration between IT and business users.

References

AI Foundry, copilot-studio

What’s New in Copilot Studio: July 2025 – Advancing Agentic Capabilities

The primary focus of this update was the introduction of Agentic Actions and Dynamic Chaining, shifting the platform from simple conversation-based triggers to reasoning-based autonomous execution.

Real-time User Journey: Dynamic Chaining

The core “journey” updated in July 2025 involves how an agent handles a multi-step request without manual “if/then” branching:

  1. Complex Prompt: A user asks, “Find the latest sales report for the Northeast region, summarize the top three concerns, and email that summary to the Regional Manager.”
  2. Reasoning: Instead of looking for a specific pre-built “topic,” the agent uses its Generative AI orchestrator to identify the necessary steps.
  3. Dynamic Action: The agent autonomously “chains” together three separate tools:
    • Tool 1 (SharePoint): Searches for and retrieves the specific PDF/Excel file.
    • Tool 2 (LLM Reasoning): Analyzes the content of that file to extract the top three concerns.
    • Tool 3 (Outlook): Drafts and sends the email to the specific contact.
  4. Completion: The agent confirms the email has been sent and provides a copy of the summary to the user in the chat.

Step-by-Step: How to Enable Dynamic Chaining

To move your agent from “Classic” mode to the new “Agentic” reasoning mode:

  • Step 1: Open Agent Settings: In Microsoft Copilot Studio, select your agent and go to the Generative AI page in the side navigation.
  • Step 2: Switch Orchestration: Under the “Orchestration” section, select Dynamic Chaining (Preview). This allows the agent to use generative AI to choose the best topic or action to fulfill a request.
  • Step 3: Add Actions: Navigate to the Actions tab. Add the specific “skills” the agent can use (e.g., pre-built connectors for Outlook, SharePoint, or custom Power Automate flows).
  • Step 4: Refine Descriptions: For every action, provide a clear, natural language Description. This is critical, as the agent uses these descriptions to “know” when to trigger that specific tool.
  • Step 5: Test & Publish: Use the Test Pane to verify the agent can correctly chain these tools together before publishing to your users.

Infographic: The Shift to Agentic AI

The July 2025 update defined a clear evolution of the platform’s architecture:

FeatureTraditional Bot (Legacy)Agentic AI (New)
Logic EngineFixed Topic Triggering (Keywords)Generative AI Orchestration
WorkflowLinear/Pre-defined PathsDynamic Chaining (Reasoning-based)
Tool IntegrationManual API CallsAutonomous Tool Use via Descriptions
User InputsSpecific Phrases RequiredComplex, Multi-intent Prompts

References

Uncategorized

The New Power Apps: Generative Power Meets Enterprise-Grade Trust

The New Power Apps: Generative Power Meets Enterprise-Grade Trust

This update marks the transition of Power Apps from a “low-code” tool to a “Generative-First” platform. It introduces a reimagined authoring experience where AI agents collaborate with humans to build, refine, and maintain applications.

Real-time User Journey: “Vibe-Coding” an App

The new user journey replaces manual drag-and-drop with a conversational, iterative process known as “vibe-coding”:

  1. Ideation: A business user types a high-level goal: “I want an app to manage our retail store’s inventory and notify me when stock is low.”
  2. Architectural Blueprint: The Power Apps Design Agent instantly drafts the full app structure—proposing a data schema, user roles, and screen layouts.
  3. Real-time Refinement: The user looks at the draft and says, “Add a barcode scanner and change the theme to match our brand colors.” The agent updates the app’s code and UI in real-time.
  4. Agentic Assistance: The maker adds an Agent Feed into the app. Now, when a store manager uses the app, they can ask the built-in agent, “Which items should I reorder based on last month’s trend?”
  5. Trust Validation: Before publishing, the Governance Agent scans the app to ensure it follows company data policies and security standards.

Step-by-Step: How to Enable the New Experience

The “New Power Apps” experience is rolled out through the updated web portal and managed environments:

  • Step 1: Access the New Portal: Navigate to the specialized entry point (announced as vibe.powerapps.com or accessible via the “Try the new Power Apps” toggle in the standard maker portal).
  • Step 4: Enable Managed Environments: This feature requires the environment to be “Managed.” Go to the Power Platform Admin Center, select your environment, and click Enable Managed Environments.
  • Step 3: Toggle Generative Features: Under Environment Settings, ensure “Copilot for makers” and “Generative AI (preview)” are set to On.
  • Step 4: Use the Design Agent: On the home screen, select “Start with a Plan.” This initiates the multi-agent builder that walks you through the data and UI generation.
  • Step 5: Add Agentic Components: Within the app designer, insert the “Agent Feed” control from the insert pane to enable human-agent collaboration within the published app.

Infographic: Legacy vs. The New Power Apps

This shift represents the biggest change to the platform since its inception:

FeatureLegacy Power AppsThe New Power Apps
Creation MethodManual UI & logic building.Generative Plans & Vibe-Coding.
User ExperienceStatic forms and galleries.Agent Feed (Interactive AI assistance).
Data InteractionManual Filter/Search queries.Natural Language Reasoning over data.
Developer ToolsExpression language (Power Fx).Multi-Agent Collaboration (AI handles the Fx).
GovernanceReactive (post-build audits).Proactive (AI-guided security guardrails).

References